Organizing Canva for Online Teachers: A Cleanup Routine
Does your Canva account feel like a junk drawer full of half-finished lessons, random uploads, old social posts, and one design you know you made but cannot find? Yep. It happens fast, especially when you teach online and Canva is part of your everyday prep. Following a structured guide like Organizing Canva for Online Teachers: A Cleanup Routine is the best way to regain control of your digital workspace.

Organizing Canva for online teachers doesn’t need to mean spending an entire weekend sorting every worksheet you’ve ever made. A few folders, better naming conventions, and a small weekly habit can make a huge difference for your productivity.
Key Takeaways
- Stop using your Uploads folder as a storage unit: Move files into organized folders immediately after creation to prevent a cluttered and unmanageable workspace.
- Build a logical folder hierarchy: Use broad categories based on your actual work patterns, such as “Archive,” “Social Media,” or specific “Student” folders, rather than an overly complex system.
- Prioritize clear naming conventions: Rename “Untitled Design” files with descriptive titles that include the topic, level, or activity type so you can easily find them later.
- Establish a sustainable maintenance routine: Dedicate 10-15 minutes each week to sorting, archiving, or deleting files to keep your digital space functional without requiring a major overhaul.
Stop Letting the Uploads Folder Become a Dumping Ground
There’s something that I”ve been doing for a long time that I’ve only become aware of recently. I have been putting literally everything in the “Uploads” folder. I don’t know how many years I’ve been using Canva, but there sure are a lot of files with numbers that I have no idea what they are.

A helpful idea shared by Canva trainer Brenda Cadman is to get out of the habit of leaving everything in Uploads. Think of Uploads as the front door, not the place where everyone lives forever.
When you make a design, give it a home right away. Open Canva’s Projects area, choose the folder it belongs in, and move it there while you still remember what it is. Or click on “Share” in the document then the little folder icon that says “Move” and put it in a folder. You can always make a new folder. This is much easier than trying to identify 70 random files three months later.
The goal isn’t to create a folder for every tiny thing. That can become its own kind of chaos. The goal is to make it easy to answer one question: “Where would I look for this?” For me, I’m grouping them in platforms, and then there will be sub folders under each place that I work for. By taking these small steps to organize your workspace, you will find that your daily workflow efficiency improves significantly.
Build a Folder Structure You Can Actually Keep Up With
A good Canva folder structure works a little like a website. You have a few main sections, then smaller sections underneath. If the top menu has 45 choices, nobody knows where to click. The same goes for folders.
Start with a small number of main folders based on the work you do most often. For an online teacher, blogger, or tutor, those folders may look different from someone else’s. That’s okay. Your Canva organization should fit your real life, not somebody else’s perfectly color-coded system.
Choose broad main categories first
What works for me might not work for you. You need to look at what you use Canva for on a regular basis and then categorize those main things into folders.
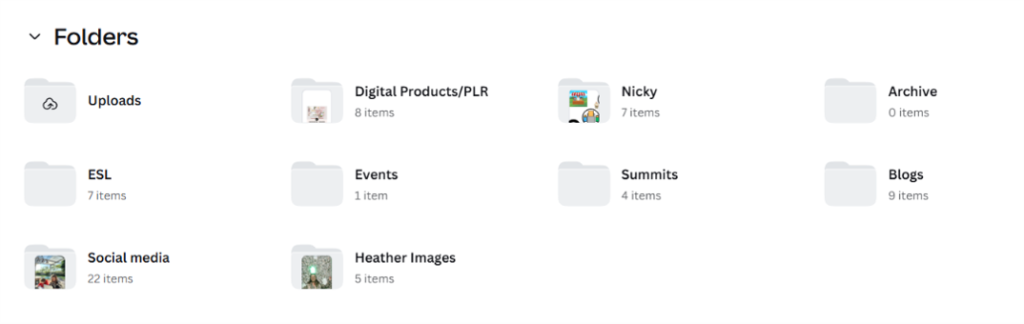
This is how I organize my main folders:
- Archive for designs you may want later but aren’t actively using.
- Events and Summits for slides, graphics, promotions, and notes related to a particular event.
- ESL Lessons for teaching materials, organized by course, company, topic, student, or level.
- Blog Content for post graphics, Pinterest pins, freebie designs, templates, and YouTube covers.
- Social Media for reusable post templates and platform-based graphics.
- Personal for school projects, birthday invitations, and family designs.
The Archive folder is especially handy. Sometimes you don’t know whether a project is worth keeping. Maybe it was a lesson that didn’t land with your students, but you might want to rework it later. Maybe it was for an event that is over, but you could reuse the style or a few slides.
Organize teaching resources subfolders in the way you think
For teaching folders, organize materials by the system that makes sense to you. Some teachers prefer folders by topic, such as phonics, grammar, speaking, and reading. Others work with several platforms or schools and need folders for each company first.
For me, I’ve got the platforms and then I subdivide those platforms further into the materials.
For example, for one of them I’ve divided it into the materials (Oxford Reading Tree, Winnie the Witch, Press Start, Dragon Masters etc.)
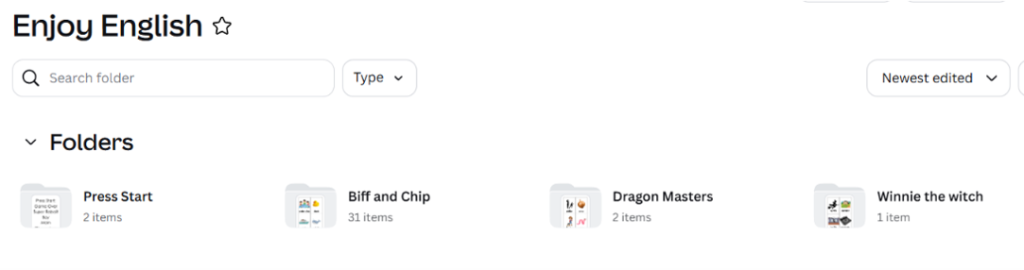
For another one it’s going to be on the phonics levels (Level 1, Level 2)
The key is to also label the files well. If I label all the Oxford Reading Tree (I call them Biff and Chip) by level and number, this will also make them easier to find.
The best system is the one your brain can remember on a tired Tuesday morning, five minutes before class.
If you know all your Biff and Chip materials live in one folder, that is enough. You don’t need to have a Pinterest-perfect filing system. You need to be able to find the lesson without muttering at your laptop.
For more classroom ideas beyond organization, Canva also shares teacher-focused Canva hacks that can help save time while you create resources.
Give Your Designs Names That Make Sense Later
Folders are only half the story. If every file inside the folder is called “Copy of Copy of Untitled Design,” you are still going to have a rough time.
Naming designs properly is one of those boring little tasks that pays off later. It is also one of the easiest things to skip when you’re in a hurry. We have all been there.
Try to name each design with the information you would need to find it again. A useful name often includes the lesson topic, level, book, activity type, or platform. Additionally, as you streamline your content creation, make sure your Brand Kit is updated with your current logos and fonts. Having a tidy Brand Kit saves you from digging through old uploads every time you start a new project.
Instead of:
Untitled DesignLesson presentationCopy of worksheetInstagram post
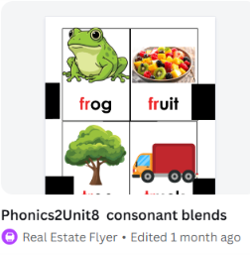
Try names like:
- Phonics2Unit8 consonant blends
Biff and Chip - TheSecret Room 4-10Winnie the Witch 1 - Vocabulary SlidesYouTube Cover - Canva OrganizationInstagram - Free ESL Activity
You don’t need to make every name long. You only need it to be clear enough that Future You knows what Past You was thinking. Future You is busy, slightly tired, and probably has a student waiting in the Zoom room.
Start where you are, even if the old stuff is a mess
It is easy to look at years of old Canva designs and think, “Well, this is hopeless.” It isn’t hopeless. It is just a bit of a project.
You don’t have to rename and sort everything in one sitting. Start with new designs first. Put them in folders and give them useful names from today onward. Then, when you have a spare 10 minutes, work through a few older files.
Maybe you find an old class background that was lovely and worth reusing. Great, move it into a reusable templates folder. Maybe you uncover a blank design or a duplicate you will never use. Delete it. No dramatic farewell required.
A little bit at a time is still progress.
Use Keep, Archive, or Delete for a Canva Cleanout
When you are ready to clean up Canva, it helps to make each design fit into one of three simple choices: keep it, archive it, or delete it.
This stops you from staring at every file for 10 minutes wondering what on earth it was for. You are not writing a museum catalog. You are trying to make your workspace usable again.
- Keep the designs you still use: Retain any active files, reusable templates, or current project files. This category should include lesson slides you teach weekly, digital product templates, social post designs, and any other design assets that you rely on for your daily teaching routine. Even if a lesson did not go exactly as planned, you might keep it if the core idea remains valuable for future learners. I’m going to keep trying “Raindrops on roses” another time, and I need to know where to find it.
- Archive finished work you may need again: Move completed event graphics, older lesson packs, and previous course resources into a dedicated archive folder. This keeps your active Canva folders clean and organized without the pressure of permanently losing your past work. If you find that you have not touched these files after a year or two, you can feel much more confident about deleting them later.
- Delete the true clutter: Blank designs, accidental duplicates, outdated drafts, and files with no purpose can safely be removed. It might feel a little intimidating at first, but remember that a blank Canva document is not a family heirloom.
If you are unsure about a design, don’t force the decision. Put it in Archive and come back to it later. The whole point of an Archive folder is that it gives you a middle option between “I need this right now” and “goodbye forever.”
Batch Organize Similar Designs Instead of Moving One at a Time
Moving files one by one is fine for a few designs. If you have a long list of old work, though, batch organizing is much kinder to your time.
Look for a group of designs that clearly belong together. Maybe you have four Biff and Chip lesson slides, several Phonics 2 activities, or a collection of YouTube cover templates. Select them together and move them into the correct folder in one go. Click on that little white square that appears in the left corner to select them. Then, at the bottom you’ll see a folder option to move them to.
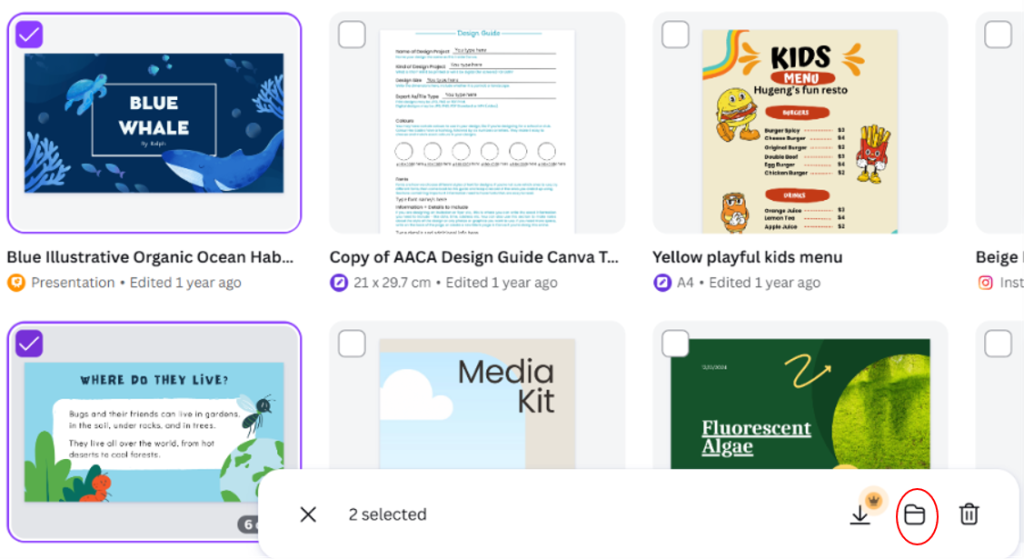
That one small move can clear a surprising amount of visual clutter.
Look for designs that are not in folders
Your Projects area can help you spot work that has never been assigned to a folder. These are often the files that cause the most trouble because they are floating around with no proper home.
As you go through them, make the three decisions:
- Keep it and move it into the right folder.
- Archive it if you may want it later.
- Delete it if it is blank, outdated, or no longer useful.
Don’t get distracted by every design you open. That is how a 10-minute cleanup turns into two hours of looking at old projects and wondering why you made a purple dinosaur worksheet in 2021.
Pick a small category, move the files, and stop when your time is up. You can always come back tomorrow.
Keep Shared Student Work in Its Own Place
Canva can be a lovely tool for creative one-to-one lessons. A student might build a website, make a presentation, plan a project, or create something based on a topic they love. I’ve got one advanced students where we literally work in Canva together on different projects.
When you are working together on a shared Canva design during a lesson, don’t mix those files into your general teaching resources. Create a dedicated folder for that student, program, or teaching platform.
This helps in a few ways. You can find the project before the lesson starts, the student’s work stays together, and you won’t accidentally delete or move something you both need. It also makes it easier to look back at what the student has created over time.
If a company or platform changes its name, update the folder name when you notice. A folder called two different things can cause unnecessary confusion later, especially when you are already trying to remember where a shared design went. I picked up this problem and have now merged the two folders.
Make Canva Organization a Small Weekly Habit
The secret is not a huge Canva cleanout that leaves you exhausted and never wanting to see another folder again. It is a short, regular habit.
Set aside 10 to 15 minutes each week. Put new designs where they belong. Rename a few vague files. Move completed projects to Archive. Delete the odd blank document that slipped through.
That is enough.
Canva allows folders within folders, even up to 10 levels deep, but most of us don’t need to use all of them. Too many levels can make resources harder to find. Keep your main categories broad, then add a second or third level only when it helps.
A folder system does not need to be perfect. It needs to be easy enough that you will keep using it.
Frequently Asked Questions
How many levels of folders should I create?
While Canva allows you to create up to 10 levels of subfolders, you should keep your structure as simple as possible. Aim for broad main categories followed by just one or two levels of subfolders, as too many layers can actually make it harder to locate your resources quickly.
Should I delete my old, unused designs?
Not necessarily. You can use a three-tier system of “Keep, Archive, or Delete.” If you are unsure if you will need a file again, move it to an “Archive” folder first; if you haven’t accessed it in over a year, you can safely delete it without worry.
What is the best way to handle shared designs with students?
Avoid mixing student-created projects with your own teaching templates. Create a dedicated folder for each student or program to keep their work isolated, which protects your personal assets and makes it much easier to track student progress over time.
How do I handle large batches of unorganized files?
You do not have to move every file individually. Use the selection tool by clicking the small white square on each design, then use the bulk move or delete options at the bottom of the screen to organize or clean up multiple files in one go.
Conclusion: A Little Order Makes Lesson Prep Easier
A messy Canva account can make lesson prep feel much harder than it needs to be. You know the resource exists, but finding it becomes a treasure hunt with no treasure at the end.
Start with a few main folders. Keep new designs out of Uploads. Name files in a way that makes sense later. Then give yourself a small weekly window to keep things in order.
A calm Canva account is built one folder at a time.
Related post: How to Make Interactive Worksheets and Games on Canva with AI for Online Classes
2 Comments